
Alerts functionality on the Rutgers IT web site
To access the alerts function of the Rutgers IT website, make sure you are in the main IT website (“Information Technology” should appear next to “My Sites” in the vertical WordPress navigation bar). From the main IT website, choose to view the dashboard and “Alerts” will be listed on the left hand navigation bar.
Adding a new Alert
Slack updates: If you revise an existing alert by either changing the “Update Status Type” field or the “Update Description” field, a new Slack will not be broadcast to the channel.
From the dashboard, visit “Alerts” > “Add new” and enter a title for the alert.
Next select the “Add Alert Update” button, which allows you to create the first item in the alert.
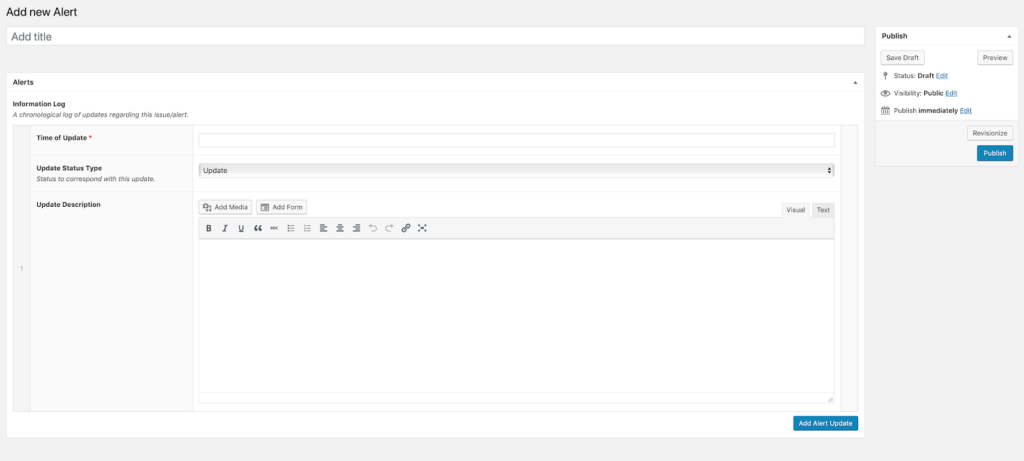
From here, do the following:
- Enter “Time of Update.” You can also choose “Now.”
- Enter “Status Type”:
– If this is an outage, use Identified or Investigating as the status type for the first alert item.
– If this is a planned maintenance, use Scheduled as the status type for the first alert item.
- Enter “Description.”
- Change “Published” date in the “Publish” sidebar to the date/time of the start of the alert.
- Publish when finalized.
Adding new status updates to existing alerts
When you need to provide a status update for an already-published alert, visit the alerts menu on the dashboard and choose the alert you would like to update.
- Choose “Add Alert Update,” which will allow you to add another labeled item (i.e., with a label like “Monitoring”, “In Progress”, etc.).
- Enter “Time of Update.”
- Enter the “Status Type,” choosing from the various options and trying to stay within these general guidelines:
– If an alert has not been resolved, choose “Update”, “Monitoring”, “In Progress” or “Investigating” depending on the status.
– For outages or other unexpected issues, use “Resolved” for the last alert item when the issue has been resolved.
– If a “Resolved” issue occurs again, within a short time after being resolved, change the existing “Resolved” status to “Update” when you provide additional information.
– For planned maintenances, use “Completed” for the last alert item instead.
- Enter “Description.”
- Publish when finalized.
Current Alerts and Notices vs. Past Alerts and Notices
If an Alert’s latest Update Status Type is set at Identified, Monitoring, In Progress, Investigating, Update, or Scheduled, the alert will remain in the Current Alerts and Notices section regardless of the Time of Update of the latest Alert update.
If you would like an Alert to remain in the Current Alerts and Notices section no matter what the latest Time of Update or Update Status Type is, toggle the Persistent Alert (found on the right column) to On.
Once the status type is changed to Notification, Resolved, or Completed, the alert will appear in the Past Alerts and Notices section within 24 hours.
Adding major alerts to Rutgers IT website homepage
- To make the Alert bell turn red on the homepage indicating that there is a significant alert, visit Theme Settings on the left side navigation bar on the main IT site’s dashboard. Choose the Alerts tab and then toggle the Alert Bell switch to On.
- To activate a site-wide banner on the top of the site on all pages, visit Theme Settings on the lefthand navigation bar for main IT site’s dashboard. Choose the Alerts tab and then follow these instructions:
- Toggle the Global Alert switch to Enable.
- Enter the URL of the Alert you need to link to.
Messages under Alerts landing page and individual pages
The standing messages on these pages should be revised only by the IT communications team. These are revised by visiting the Theme Settings at the core site.

Updating alerts on Facebook and Twitter accounts
For Facebook:
- Reference the first section of the Alert page titled WP2Social Auto Publish.
- Toggle to Yes so that it is highlighted blue for the Facebook post.
- Posting method should read “Share a link to your blog post.”
- Make sure that the Message format for posting section features {POST_TITLE} only.
- Click the blue Update button located on the right side navigation bar to post when you are done with the Alert Update and social media posts.
For Twitter:
- WP to Twitter is located on the right side navigation bar on the bottom.
- Type in your custom Twitter post.
- Make sure Tweet is highlighted in blue.
- Click the blue Tweet Now button at the top of the section when you are ready to post.
- Click the blue Update button located on the right side navigation bar to post when you are done with the Alert Update and social media posts.
